Here I will show how to configure Self-Serviced Ephemeral Instances for Helm projects with Reliza Hub. This is going to be a complete end-to-end tutorial.
I will use Rebom project as an example and use GitHub Actions as our CI platform – although any other CI may be used in practice.
Note that any Kubernetes deployable project can be made compatible with this approach. If your project does not have a Helm chart yet, refer to my earlier post about how to Helmify it.
The only tools required for this tutorial are Reliza Hub and GitHub with GitHub Actions. You can complete the tutorial on free tiers of these tools.
Table of Contents
I Project Structure
Our Rebom project is a monorepo that contains 3 components: Backend, Frontend, Helm chart. Rebom also makes use of PostgreSQL database and Flyway for database migrations.
The existing Helm chart is already fully prepared to be integrated with Reliza Hub ephemerals. However, a generic Helm projects needs to be made compatible with Reliza Hub Ephemerals – please refer to the tool documentation for more details.
II Preparing Projects on GitHub and Reliza Hub
We start with forking Rebom project on GitHub.
Once that is done, create Rebom organization on Reliza Hub and create projects for Backend, Frontend and Helm chart. Follow documentation on creating projects, note that in this case all projects share same GitHub repository, since this is a monorepo. Versioning schema and branching versioning schema for the Helm chart project must be set to “semver” – as this is a Helm requirement. For the backend and the frontend projects, any versioning schema may be used.
III Preparing Container Storage
Next, we will need a storage for container images that are going to be built. Any container storage may be used, such as ACR or ECR, it is also possible to use built-in container storage functionality on Reliza Hub.
For activating and configuring Reliza Hub Registry, refer to official documentation here.
For the purposes of this tutorial, I will use private Reliza Hub registry, which will be in the form registry.relizahub.com/uuid-private.
I’m also going to create a set of credentials to access this private registry as described in Reliza Hub documentation referenced above. Make note of registry URI and credentials as they will be used later in this tutorial.
IV Setting up GitHub Actions
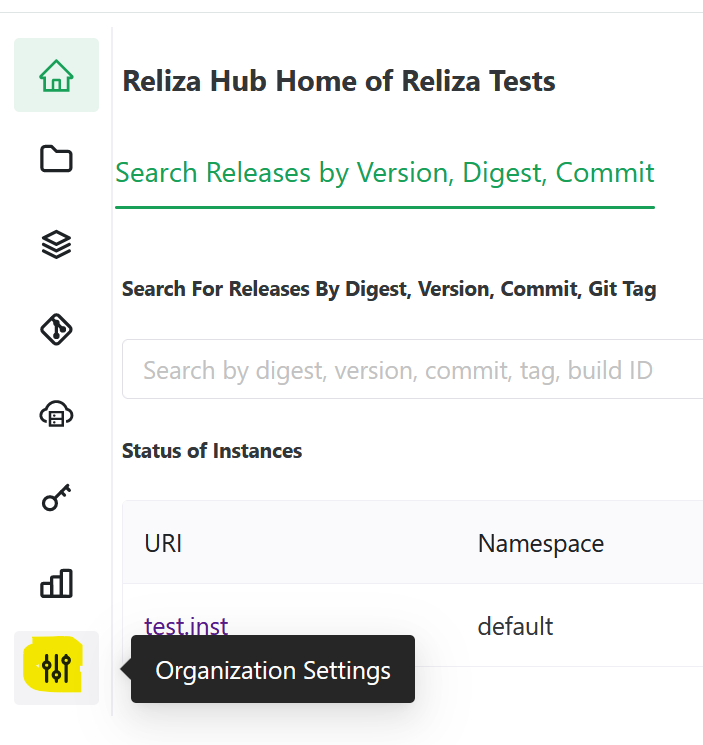
We will first create an Org-Wide Api Key in Reliza Hub to stream GitHub Actions metadata to Reliza Hub. For this, navigate to the Organization Settings menu in Reliza Hub.
And then click on the Programmatic Access tab. Click on the Plus-Circle Icon to create an Api Key and select Org-Wide Read-Write as a key type. Note API ID and API Key for future use.
Now, we need to provision secrets for our project in GitHub. For this, navigate to the Settings tab of your GitHub project and proceed to the Secrets and Variables entry in the Security section in the menu on the left and click on Actions sub-menu.
You should now be on the Actions secrets and variables page.
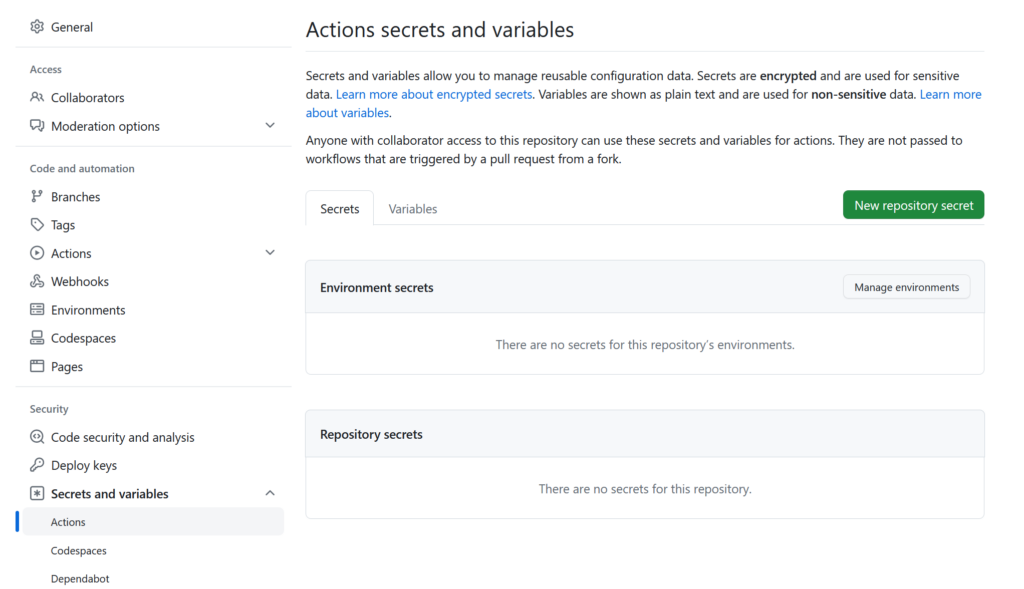
From here, for each secret, click on the New repository secret button.
You would need to create following secrets:
- DOCKER_LOGIN – I will use login credential to access Reliza Hub registry configured above.
- DOCKER_TOKEN – again, this would be token part of the registyr credential.
- RELIZA_API_ID – this would be org-wide Reliza API ID that we generated above.
- RELIZA_API_KEY – again, this would be org-wide Reliza API Key corresponding to the ID that we also generated above.
Now, we need to update GitHub Actions Workflow yaml to propagate our new configuration. In your forked repository, open in your favorite editor the .github/workflows/github_actions.yml file – or you can use GitHub interface to edit it directly in there.
In this file for every component of the monorepo we need to edit image_namespace and reliza_project_id keys. Image namespace would essentially be URI of our registry (I will use the one provided by Reliza Hub) – note here that it slightly differs for the Helm chart. Reliza Project Id can be picked from Reliza Hub’s project view for each corresponding project.
See my commit here for the scope of changes that should be done.
Next, we need to enable GitHub Actions on the forked repository. For this, in our forked repository on GitHub, navigate to the Actions tab and click on I understand my workflows, go ahead and enable them.
V Trigger builds for all forked projects
For each project, we already have trigger_build files, I’m going to increment integer in each of them to trigger builds:
- backend/trigger_build
- frontend/trigger_build
- helm/trigger_build
Once the GitHub Actions build completes, you should have a release for every project in Reliza Hub.
VI Create Bundle in Reliza Hub
Now we are going to create a Bundle in Reliza Hub for our Rebom project which would combine all its components.
For this, click on the Bundles icon in the left menu of Reliza Hub. Then click on the Plus-Circle icon to Add New Bundle. You can put any name – I will just name it Rebom. And you can choose any version schema, I’m going to use Ubuntu CalVer.
Click Submit button – your new bundle is now created!
VII Set Up Auto-Integrate for the Bundle
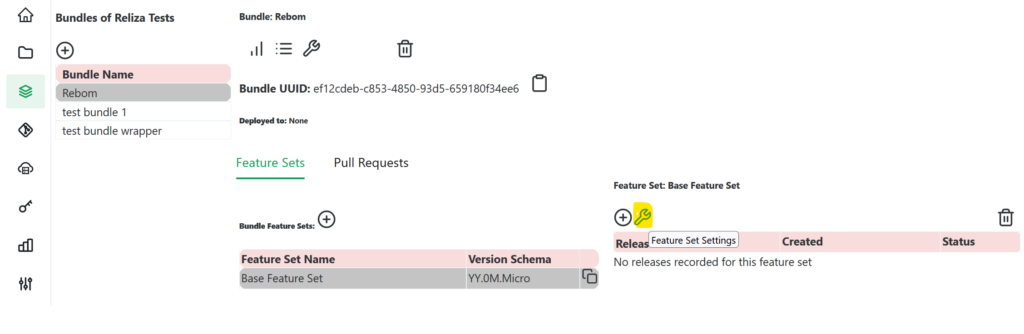
In our newly created bundle, click on the Wrench icon in the Feature Set section – Feature Set Settings –
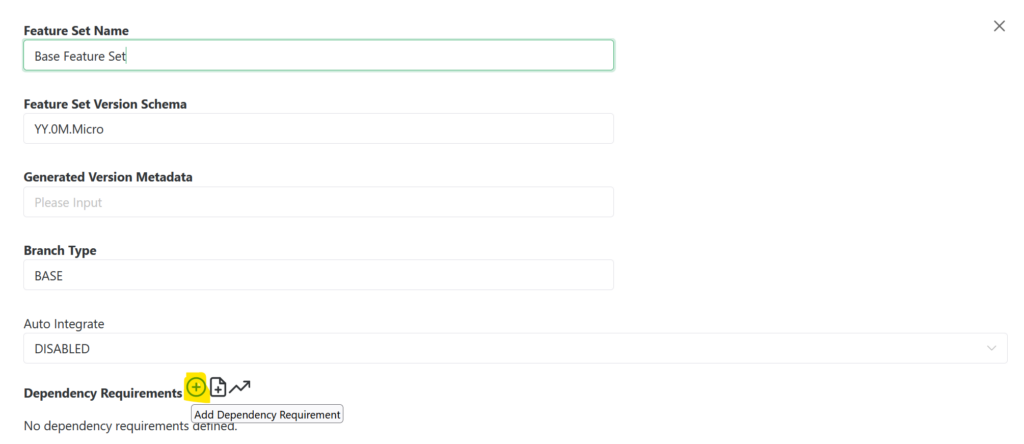
In the opened modal, look at the Dependency Requirements section on the bottom – that is currently empty. For each dependency (we are going to have 5 total), click on the Plus-Circle icon near it – Add Dependency Requirement –
and create following 5 dependencies:
Parent Project– Frontend,Parent Project Branch– master,Pinned Release– leave empty,Project Requirement Status– RequiredParent Project– Backend,Parent Project Branch– master,Pinned Release– leave empty,Project Requirement Status– RequiredParent Project– Helm,Parent Project Branch– master,Pinned Release– leave empty,Project Requirement Status– Transient (note, we are using transient status here to allow for matching of deployments that do not use Helm chart for any reason).- Next dependency is going to be open-source PostgreSQL dependency, therefore first switch
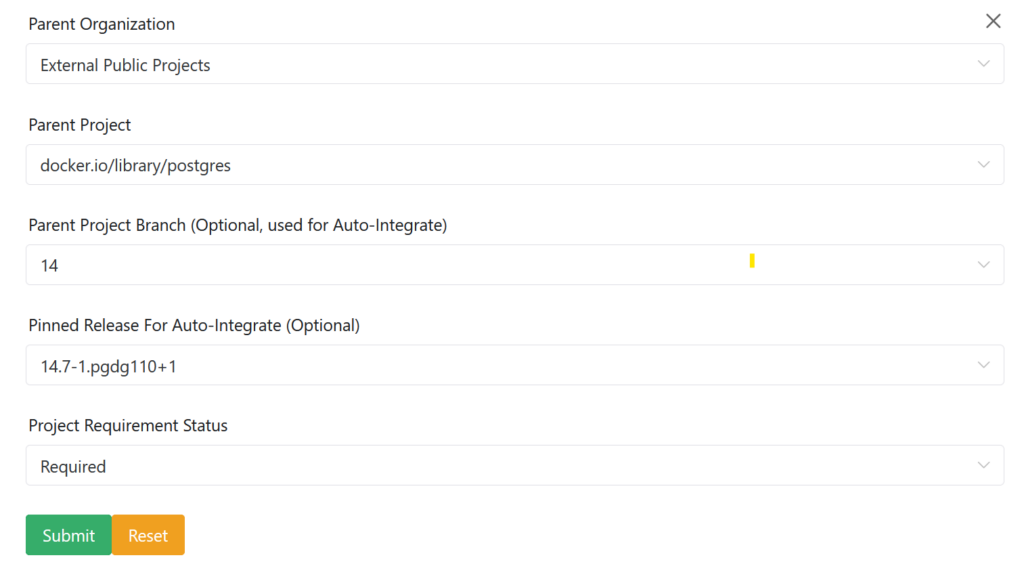
Parent OrganizationtoExternal Public Projects, selectdocker.io/library/postgresas a project, pick14branch and pick latest pinned version – in my case this would be14.7-1.pgdg110+1, then setProject Requirement Statusas Required – as following:
5. Last dependency is going to be open-source Flyway image. It is creation is similar to postgres: switch Parent Organization to External Public Projects, select docker.io/flyway/flyway as a project, pick 9-alpine branch and pick latest pinned version – in my case this would be 9.2.3-alpine, then set Project Requirement Status as Transient (we are using Transient here to support cases, where flyway may be run separately).
You should now have 5 dependencies for your Feature Set.
Now, switch Auto Integrate dropdown to ENABLED. With this, Reliza Hub will now automatically create new Bundle release for every New project release that is created.
VIII Update Project References in Helm Chart
Open helm/rebom/values.yaml file in your favorite text editor or directly in GitHub and update references to the Backend and Frontend projects to the image registry that you created.
Again, I’m going to use Reliza Hub private registry that we created above for this purpose. See my commit here showing scope of the change.
Once this commit is pushed, this will also trigger GitHub Action for the Helm chart, and when done – should create both new Helm chart project release and a new bundle release.
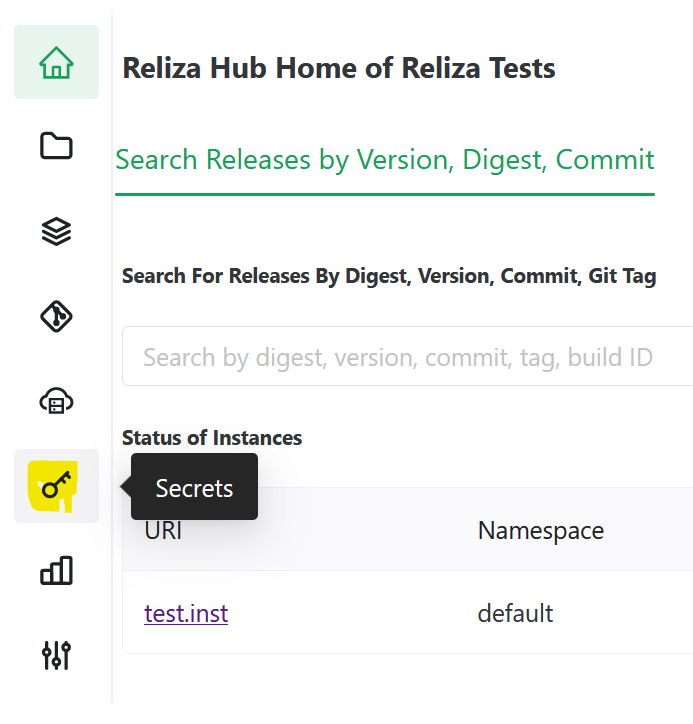
IX Configure Secrets in Reliza Hub
Now, we need to register credentials – login and token – to pull Helm chart and container images in Reliza Hub. For this, navigate to the Secrets page:
Once on the Secrets page, click on the Plus-Circle icon to add a new secret.
We will need to create unique names for each secret. I will name then rebom_registry_login and rebom_registry_token. Description field may be left empty. For actual secrets, fill in credential values obtained above.
Once secrets are created, we need to update secret distribution for each secret to make them readable by ephemerals. For each secret, click on the distribution icon:
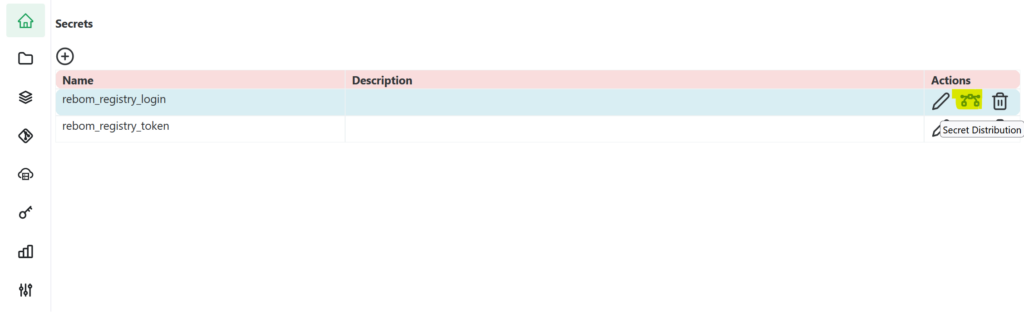
In the distribution menu, pick READ_ONLY for All Reliza Spawned Instances for each created secret – this will make those secrets readable by ephemerals.
X Configure Helm Project in Reliza Hub
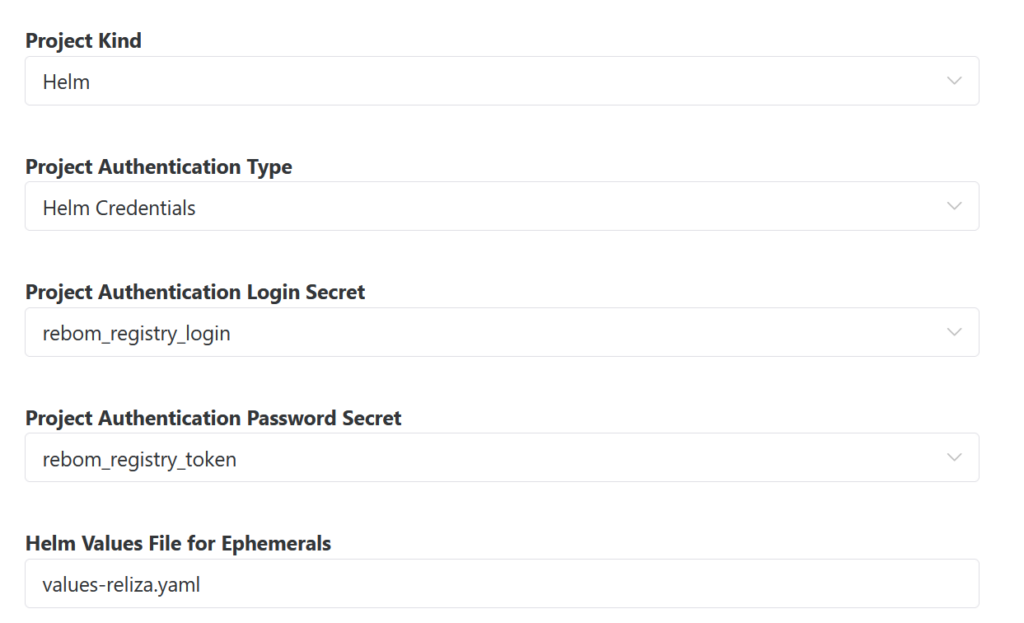
Next, we will need to mark Helm Project in Reliza Hub as Helm and configure authentication for pulling Helm chart.
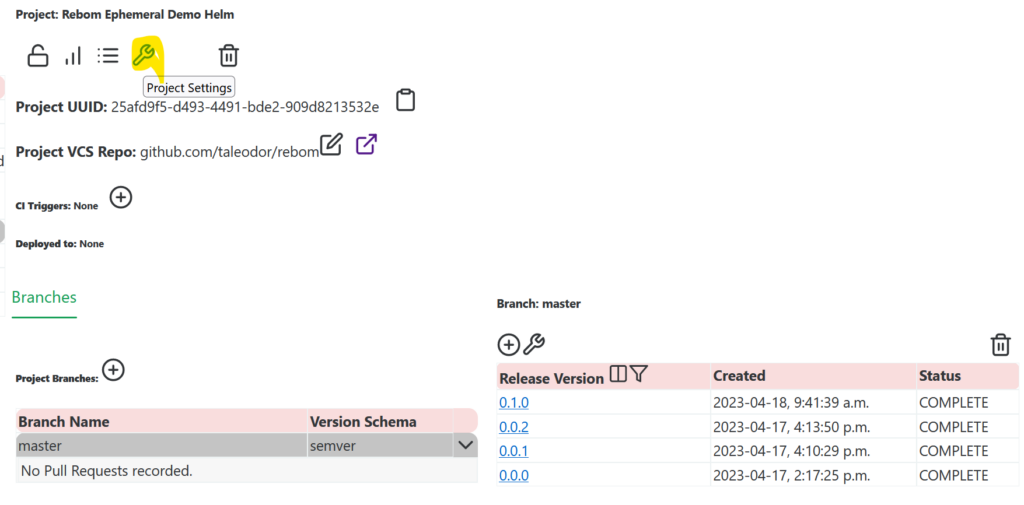
Navigate to the Projects screen in Reliza Hub and select Helm project. Click on the Wrench icon to show Project settings:
In the Settings modal, switch Project Kind to Helm, pick project authentication type as Helm credentials (unless you are using ECR, in which case pick `ECR credentials).
Then set login and password secrets to the secrets we registered previously on Reliza Hub.
Finally, enter values file to use for ephemerals, we will use values-reliza.yaml – this file already exists in the original rebom project, but we will modify it later with our secret reference.
As a result, this whole section of Project Settings should look like following:
XI Update Helm Chart Values with secret references
We now need to update helm/rebom/values-reliza.yaml file with expected secrets for downloading containers in a live cluster.
We will update values for backend and frontend components to use regcred credential for picking image and we will configure ecr-regcred subchart to create this credential based on secret input from Reliza Hub.
Note here, that the secret names must match names that we set for them when creating on Reliza Hub. Also Reliza Hub only submits secrets in the sealed form, so we use that setting in ecr-regcred option.
You can see the whole change in this commit.
Wait until the build completes and a new bundle release is created before proceeding to the next step.
XII Create Ephemeral
We can now go ahead and create an ephemeral instance in Reliza Hub. Navigate to the Instances page in Reliza Hub. Click on the Plus-Circle icon – Add Instance. Select Auto Ephemeral tab, pick Rebom as parent bundle, pick Base Feature Set, select latest release – the screen should look something like this –
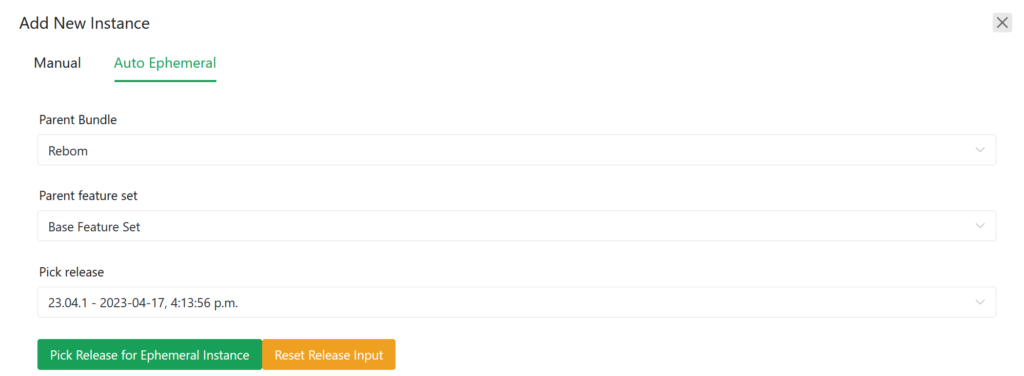
From here, click on the Pick Release for Ephemeral Instance button.
On the next screen, you may adjust auto-destroy configuration as desired, currently max lifespan of an ephemeral in Reliza Hub is 168 hours. Click Submit – and this will initiate creation of an ephemeral. If you have configured Slack or MS Teams integration for your organization, you will receive notifications of the progress in those tools.
In ~5 minutes your instance should be ready and accessible via URI assigned by Reliza Hub.
Note that ephemeral instance supports all standard Reliza instance manipulations, i.e. you can update bundle release version to newer as it becomes available.
XIII Destroy Ephemeral
The ephemeral will be auto-destroyed by Reliza Hub after the interval specified at the instance creation.
If you would like to destroy the ephemeral earlier, click on the Trash icon in the upper-right corner of the instance view.
XIV Summary
This tutorial showed how a Helm project can be spinned into an Ephemeral Instance on the Reliza Hub.
In the future tutorials I’m going to cover following additional functionalities:
- Connecting a Persistent instance to Reliza Hub using Reliza CD project.
- Instance Manipulations using Reliza Hub.
- Approval Management via Reliza Hub.
- Ephemerals on Pull Requests with Reliza Hub.
- Other functionalities as they are going to be released.
5 comments