One of the most frequent questions in modern DevOps world is how to promote software from Development environment all the way to Production – via Test, UAT, Staging and other lower level environment if applicable.
The challenge here is two-fold:
- We want to follow Trunk-Based Development and build-once-ship-everywhere strategies.
- We want developers to be able to push code freely to the main branch. But we don’t want raw or untested changes to show up in our Production environment.
Below I will show how we manage the above with Reliza Hub. This will be continuation of my 2 previous tutorials:
Table of Contents
I Task Formulation
Using the same Rebom project as in my previous tutorials, we will now consider having 3 persistent instances: Dev, Staging, Production.
We are going to configure an approval system in Reliza Hub, such that any latest bundle release would automatically get deployed to Dev.
We will then require QA approval for the bundle to be promoted to the Staging environment. Next we will additionally require PM approval for the bundle to be promoted to production.
II Configure Approval Matrix
In Reliza Hub, approval policies are managed via Approval Matrix. The matrix lists approvals needed for a release to be promoted to each respective environments.
As mentioned above, we want any latest release to be deployed onto Dev environment, then we want QA approval to get deployed onto Staging, and on top of that we want PM approval to get deployed onto production.
To set this in the matrix, open Organization Settings page in Reliza Hub and navigate to Approval Matrix tab.
Keep using pre-configured default application.
Then set Approval Matrix as following:
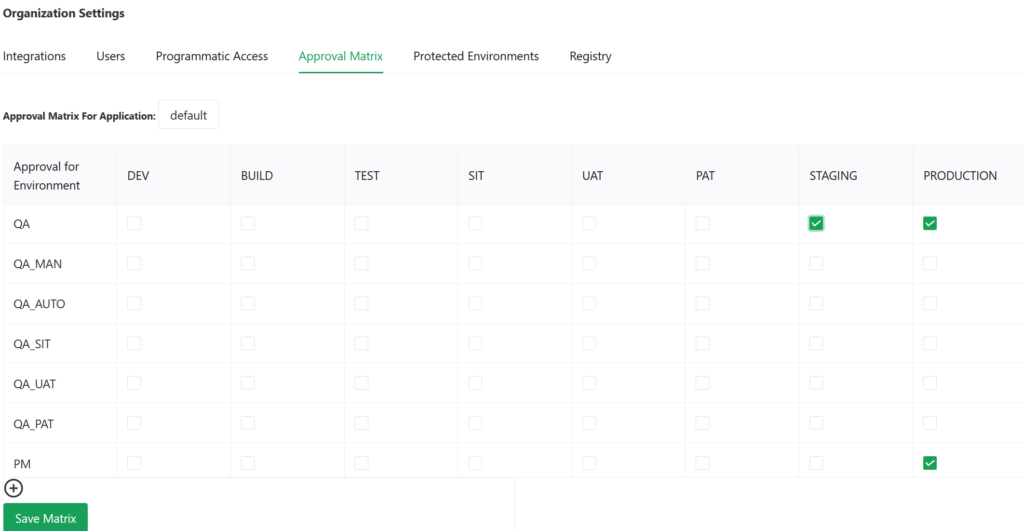
and click on the Save Matrix button.
Our approval policy is now set, and we will now proceed with setting up environments.
III Setting up Environments
We already set up a Dev instance as shown in my Reliza CD Tutorial. Now, follow the same process to set up Staging and Production instances.
Important thing is to select proper environments on the instance creation, for example when creating a Staging instance, use create input instance as following:
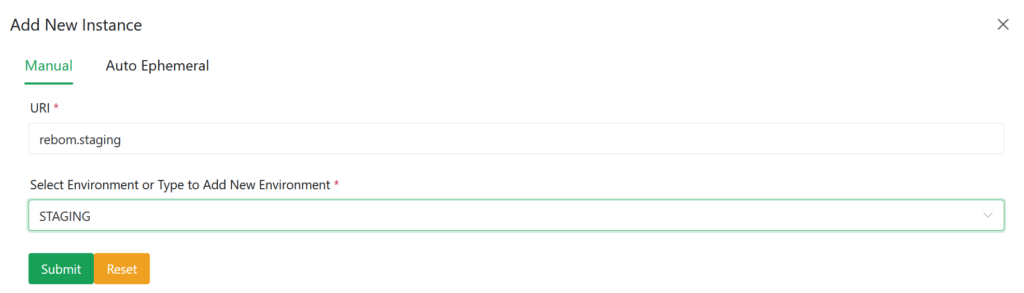
Then, create a Production instance in a similar way.
Connect both new instances to Reliza Hub via Reliza CD as shown in my Reliza CD tutorial. Note, here that you can skip this step for now as it is not required for seeing the actual approval logic – you would need to do it though to have the software actually deploying on each respectful environment.
Once new instances are created, assign Rebom Base Feature Set to each of them with the Follow integration type – same way as we did for the Dev instance in my previous tutorial.
IV Approval Logic to Promote Software
Notice that when you first assign a release, the Target field would show Not Set and therefore no deployment will happen:
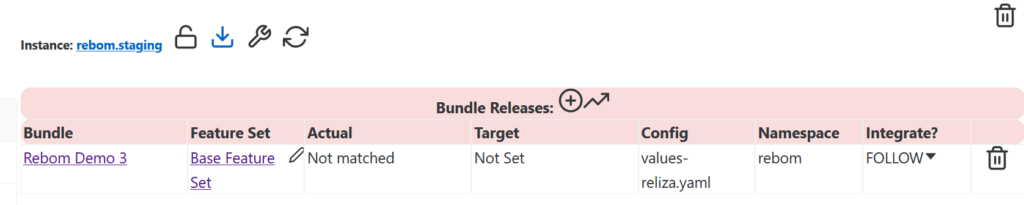
That is because we do not currently have any release that matches our approval policy for staging.
To change this, navigate to the Bundles page in the left-hand menu, select Rebom bundle and open latest available release.
In the Approvals section, grant QA approval:
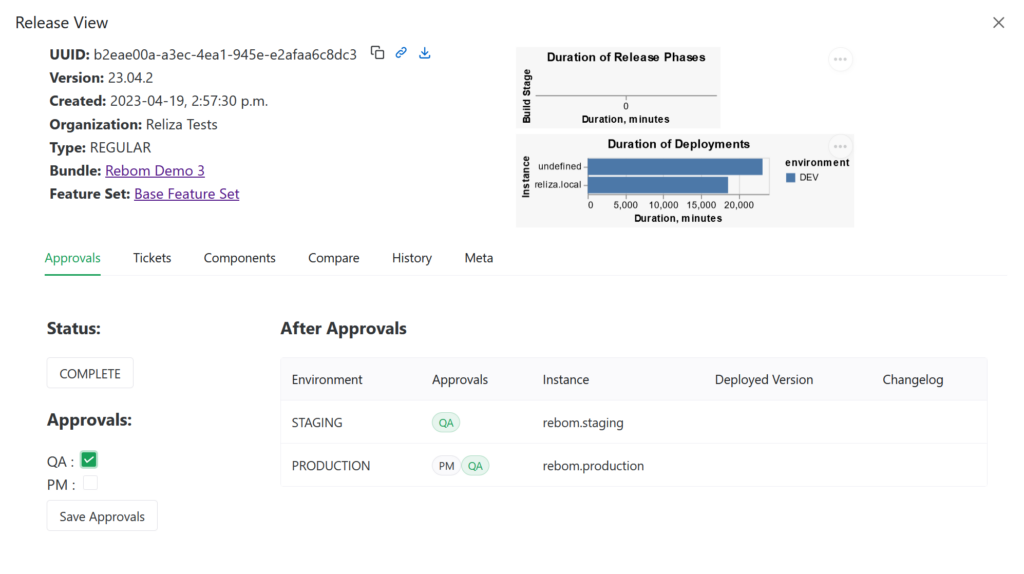
And click the Save Approvals button.
Now, close the release view and navigate back to the Instances page and open the rebom staging instance for viewing. Notice that it now has the release we just approved as its Target and the sync process is on-going, if Reliza CD has been set up on the instance.
Navigate now to the rebom production instance and notice that it still does not have any target release – that is because our release only has QA approval, but it also needs a PM approval to be deployed to Production. If you additionally set a PM approval on the release, that would trigger a deployment for our production instance.
V Configuring Approval Permissions for Users
To invite a user to your organization in Reliza Hub, navigate to the Organization Settings page and click on the Users tab. Below the list of users, enter user’s email and select READ_ONLY initial permission level, then click the Invite button.
Once the user accepts the invitation, refresh the users page, and you will notice that the user is now active. Click on the pen icon with the title Modify user permissions near the newly added user. In the bottom of the modal you can set permissions that the user is allowed to set, and set desired permissions – i.e. QA.
Once saved, this user will be allowed to give specific approvals.
Note that currently free plan of Reliza Hub only allows for 2 users in the organization.
VI Configuring Approval Permissions for Programmatic Agents
There are situations where you want to give automated approvals. In example, at the end of an automated test if it passes, you may want to give QA_AUTO permissions.
To configure programmatic access for such permissions, navigate to the Organization Settings page in Reliza Hub and click on the Programmatic Access tab. You will see a list of existing API Credentials – you will have a few there if you followed my previous tutorials.
Click on the plus-circle icon in the bottom-left of the list, choose Approval Only Key type:
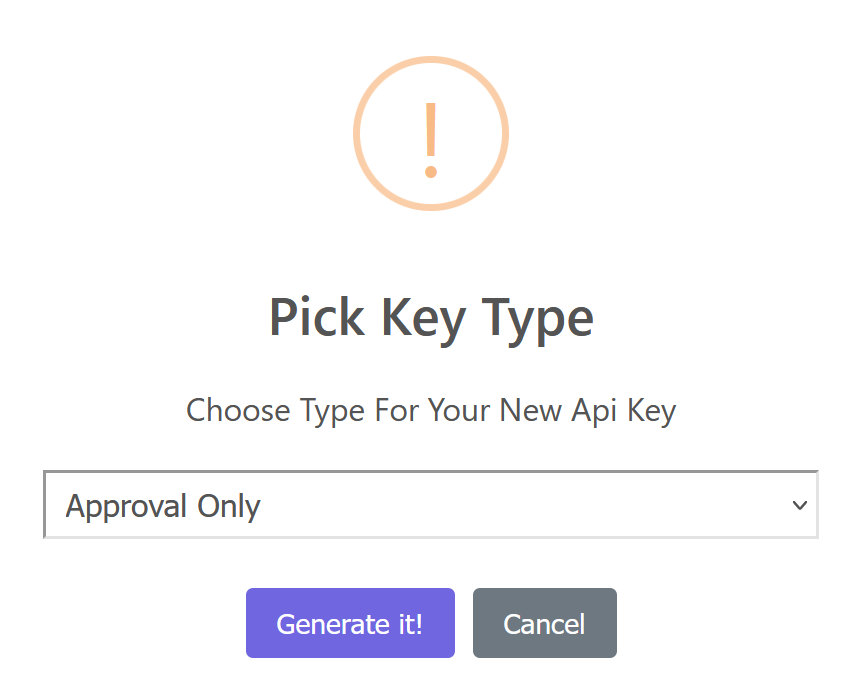
and click Generate it! button.
Note shown API credentials. Click OK and you will see a new Approval key in the bottom of the list – click now on the pen icon on the right of the Approval key row. You will be presented with a modal where you can set which types of permissions this particular key may give.
Once the credential is created, use Reliza CLI in the end of your test job to set corresponding approvals on the releases following CLI documentation here.
VII Manual Overrides and Rollbacks
Sometimes you may have an incident or a test where you want to quickly change approved target release to something else.
For this, navigate to the chosen instance, for configured bundle change Integrate? from Follow to Target. You will notice a little pen icon near the Target version. Clicking on it will enable selection of desired version. Version selected this way will be used as a Target.
Selecting a Target version can be useful for a quick rollback. Another way to do a rollback is to disapprove a release. Note, that only an Organization Administrator can perform changes for releases deployed to production.
There are few other manual operations, permissions restrictions and configurations that are present in Reliza Hub around this logic – I will discuss them in a future tutorial.
VIII Summary
Enterprise-ready approval policies to promote releases all the way from Development to Production is a very important piece in overall DevOps automation.
Above I have shown how this can be achieved with the use of Approval Matrix policies in Reliza Hub.
This essentially allows for the main branch in Trunk-Based Development (TBD) pattern to be open for commits or merges – as they do not risk landing on higher level instances without required approvals.
So we can both use TBD and ensure that we have all approval gates to promote the software to production in place.
1 comment