In this tutorial I will present reference setup for Kustomize Deployments with Reliza Hub. We will use our Rebom project as a base. This tutorial would be similar to the workflow I described in the Helm tutorial, but this time it is for Kustomize instead of Helm.
Table of Contents
Prepare Components on GitHub and Reliza Hub
Fork Rebom project on GitHub. In this tutorial, I am using my https://github.com/Reliza-Demos/rebom-for-kustomize fork.
Once your fork is ready, create Rebom organization on Reliza Hub and create components for Backend and Frontend – following documentation here. Note that in this case both components share same GitHub repository, since this is a monorepo. Any versioning schema may be used. I’m going to use Ubuntu CalVer.
Prepare Container Storage
We will need a storage for container images that are going to be built. Any container storage may be used, such as ACR or ECR. It is also possible to use built-in container storage functionality on Reliza Hub.
For activating and configuring Reliza Hub Registry, refer to the official documentation here.
For the purposes of this tutorial, I will use public Reliza Hub registry, which will be in the form registry.relizahub.com/uuid-public.
I’m also going to create a set of credentials to push to this public registry as described in Reliza Hub documentation referenced above. Make note of your registry URI and credentials as they will be used later in this tutorial.
Create Bundle on Reliza Hub
Now we are going to create a Rebom Bundle in Reliza Hub which would combine all its deployable components.
Click on the Bundles icon in the left menu of Reliza Hub. Then click on the Plus-Circle icon to Add New Bundle. Name the bundle Rebom. And you can choose any version schema, I’m going to use Ubuntu CalVer.
Click Submit button – your new bundle is now created!
In our newly created bundle, click on the Wrench icon in the Feature Set section – Feature Set Settings.
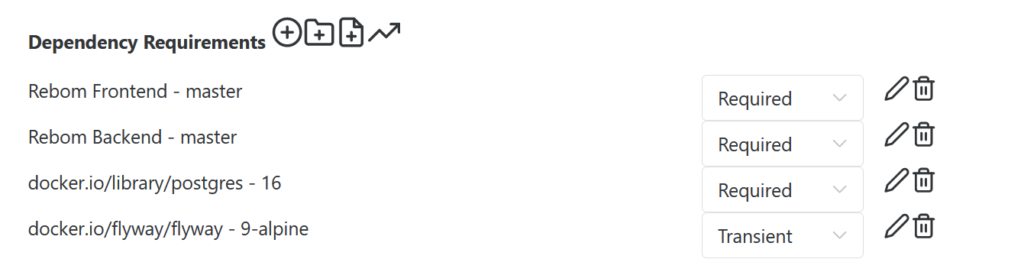
In the opened modal, look at the Dependency Requirements section on the bottom – that is currently empty. For each dependency, click on the Plus-Circle icon near it – Add Dependency Requirement – and create following 4 dependencies:
Parent Component– Rebom Frontend,Parent Component Branch– master,Pinned Release– leave empty,Component Requirement Status– RequiredParent Component– Rebom Backend,Parent– master,ComponentBranchPinned Release– leave empty,Project Requirement Status– Required- Next dependency is going to be open-source PostgreSQL dependency, therefore first switch
Parent OrganizationtoExternal Public Projects, selectdocker.io/library/postgresas a component, pick16branch, leave Pinned Release empty, then setComponent Requirement Statusas Required. - Last dependency is going to be open-source Flyway image. It is creation is similar to postgres: switch
Parent OrganizationtoExternal Public Projects, selectdocker.io/flyway/flywayas a project, pick9-alpinebranch, leave Pinned Release empty, then setProject Requirement Statusas Transient (we are using Transient here to support cases, where flyway may be run separately).
You should now have 4 dependencies for your Feature Set as shown below.
Now, switch Auto Integrate dropdown to ENABLED. With this, Reliza Hub will automatically create a new Bundle release for every New Component release that is created. To create your very first bundle release, click on the broken arrow icon “Trigger Auto Integrate”.
Setting up GitHub Actions
We will first create an Org-Wide Api Key in Reliza Hub to stream GitHub Actions metadata to Reliza Hub. For this, navigate to the Organization Settings menu in Reliza Hub.
Go to Organization Settings page in Reliza Hub and then click on the Programmatic Access tab. Click on the Plus-Circle Icon to create an Api Key and select Org-Wide Read-Write as a key type. Note show API ID and API Key for future use.
Now we need to provision secrets for our project in GitHub. For this, navigate to the Settings tab of your GitHub project and proceed to the Secrets and Variables entry in the Security section in the menu on the left and click on Actions sub-menu.
You should now be on the Actions secrets and variables page.
From here, for each secret, click on the New repository secret button.
You would need to create following secrets:
- DOCKER_LOGIN – I will use login credential to access Reliza Hub registry configured above.
- DOCKER_TOKEN – again, this would be token part of the registyr credential.
- RELIZA_API_ID – this would be org-wide Reliza API ID that we generated above.
- RELIZA_API_KEY – again, this would be org-wide Reliza API Key corresponding to the ID that we also generated above.
Now, we need to update GitHub Actions Workflow yaml to propagate our new configuration. In your forked repository, open in your favorite editor the .github/workflows/github_actions.yml file – or you can use GitHub interface to edit it directly in there.
In this file, remove the build-helm job as we are deploying with Kustomize and not Helm here. Then for both frontend and backend components we need to edit image_namespace and reliza_project_id keys. Image namespace would essentially be URI of our registry (I will use the one provided by Reliza Hub). Reliza Project Id can be picked from Reliza Hub’s component view for each corresponding component. See my commit here to see an example of what should be done.
Next, we need to enable GitHub Actions on the forked repository. For this, in our forked repository on GitHub, navigate to the Actions tab and click on I understand my workflows, go ahead and enable them.
Trigger build for both backend and frontend project to create images. To do this, increment integer in the following files:
- backend/trigger_build
- frontend/trigger_build
Once the GitHub Actions build completes, you should have a release for both Backend and Frontend components in Reliza Hub.
Set Up GitOps Kustomize Repository
Clone Reliza Demos repository:
git clone https://github.com/relizaio/reliza-demosCreate Rebom Kustomize deployment repository – I will use https://github.com/Reliza-Demos/rebom-kustomize created for this Demo. Then run the following shell commands – while replacing my repository URI with your URI:
mkdir rebom-kustomize
cp -r reliza-demos/rebom-kustomize/* rebom-kustomize/
cd rebom-kustomize
git init
git add .
git commit -m "chore: initial commit"
git branch -M main
git remote add origin https://github.com/Reliza-Demos/rebom-kustomize.git
git push -u origin main
In your new repository, in demo and staging directories modify all Rebom images to match your custom naming. Specifically, all backend and frontend patch yaml files need to be edited. Refer to this commit as a sample of what needs to be done.
Push your changes into the new repository.
Create Rebom Kustomize component on Reliza Hub pointing to this repository. Any version schema may be chosen.
In your Rebom Kustomize GitHub repository, set the following 2 secrets for GitHub Actions:
- RELIZA_ORGWIDE_API_ID – this would be org-wide Reliza API ID that we generated above.
- RELIZA_ORGWIDE_API_KEY – again, this would be org-wide Reliza API Key corresponding to the ID that we also generated above.
Edit .github/workflows/reliza-kustomize.yaml file in the new repository and update component ids into valid ids as seen on Reliza Hub.
Commit and push all the changes.
Switch Kustomize Repository to Listen to Reliza Hub Updates
In this section we will configure our GitHub Action in the Kustomize GitOps repository to listen to new builds as they appear on Reliza Hub.
As described in Reliza Hub Documentation here, change the trigger in the GitHub Action .yaml file from on push to:
on:
  repository_dispatch:
    types: [reliza-build-event]
See my commit here showing the change.
Then authorize Reliza Hub for this GitHub repository at https://github.com/apps/reliza-hub and note installation ID as described in the documentation.
In Reliza Hub, open Rebom bundle and click on the plus-circle icon near CI Triggers – Add Integration:

Select GitHub, you can leave Name of GitHub Actions Event blank – this will default to “reliza-build-event”.
Enter GitHub App installation ID in the corresponding field as recorded earlier. Check Active? field, then choose your rebom-kustomize GitOps repository in the CI repository field.
Pick ANY in the events to trigger.
Click on Save CI Integration.
You can then click on the Play icon – Trigger Integration to test that it is working.
Configure Approval Matrix
This tutorial assumes that we are running 2 deployments: test and staging. We can say that our test deployment is always pointing to latest available versions as seen on Reliza Hub.
However, for the staging deployment we would like to have some approval – for example, by our QA team.
To ensure this, open Organization Settings page in Reliza Hub, navigate to Approval Matrix and check QA box for the STAGING environment as seen below, then click Save Matrix.

Once this is done, approve your first bundle for QA – just so we have something to deploy onto the Staging environment.
Note that Reliza Hub would be sending events to GitHubs on new builds as well as on changes in approvals.
After all this is done, any new Rebom bundle releases will automatically propagate onto the Test environment, but only QA approved releases would propagate onto the Staging environment.
Connect to GitOps Tool and Verify Pipeline
You can now point your favourite GitOps tool, such as ArgoCD to the rebom-kustomize repository.
For this tutorial, point ArgoCD for the test cluster to the /test location and ArgoCD for the staging cluster to the /staging location.
For example, if you are deploying a fresh test cluster, you would first install Argo:
kubectl create ns argocd
kubectl apply -n argocd -f https://raw.githubusercontent.com/argoproj/argo-cd/stable/manifests/install.yaml
And then deploy Argo app pointing to your repository. You can check my sample script here, update it with proper source URL of your fork and apply.
Similar technique can be used for the staging cluster, but instead of test the source.path should be set to staging in the Argo application definition.
Then you can try creating a test build of an underlying component – in example Frontend. Once the build completes, a new bundle will be created which would trigger GitOps repository update. Notice that this bundle will automatically propagate to Test, but not to Staging – since we have set an approval gate there.
Argo or your other GitOps tool will pick up the update, if any, and update the actual test deployment accordingly.
Summary
I have shown above how you can have a fully configured CICD pipeline based on Kustomize using Reliza Hub for the release management system.
For any questions, find me at https://devopscommunity.org Discord – and either ask me in one of the public channels or send me a private message.