UPDATE (2023-05-02): This tutorial, while still works, is now outdated. The recommended way is to deploy software via Reliza CD – see my new tutorial on that here.
In this tutorial I’m going to show how to build Continuous Delivery system with Helm and Reliza Hub.
We are going to build CI/CD on top of Mafia Card Shuffle project. It is a very simple application that has UI and back-end microservices and uses Redis for persistent storage.
Here is a quick overview of what we are going to build:
- Continuous Integration (CI) system using GitHub Actions to build Docker images for each microservice and compile deployment Helm chart. Note that GitHub Actions could be swapped with any other CI tool if needed.
- Configure Reliza Hub Registry to store images and Helm chart
- Deploy custom-build Helm image deployed as a CronJob to perform Continuous Delivery (CD) operations on the Kubernetes cluster
- Configure Reliza Hub to signal to our CD system which image should be deployed when. Reliza Hub will also be used to monitor state of deployment.
As a prerequisite I assume that you have a running Kubernetes cluster. Absolutely anything will work with k3s being most popular simple choice for many platforms. Side note – if you want to have k3s running on Windows – see here how to achieve that.
Note that this tutorial is also available as a video tutorial, please find it here.
Also, if you have any questions, feel free to reach out to me via DevOps Community Discord at https://devopscommunity.org.
Table of Contents
Step 1. Fork Git Projects
So first thing first, go ahead and fork 3 Mafia Card Shuffle projects on GitHub:
- https://github.com/Mafia-Demo/mafia-express (backend)
- https://github.com/Mafia-Demo/mafia-vue (UI)
- https://github.com/Mafia-Demo/mafia-deployment (Helm chart is here)
Step 2. Set up Organization and Projects on Reliza Hub
Register at app.relizahub.com, verify your email and create an organization, let’s call it “Mafia Helm Tutorial” (or pick any other name that you like). If you already have a login on Reliza Hub, you can create a new organization from the profile page.
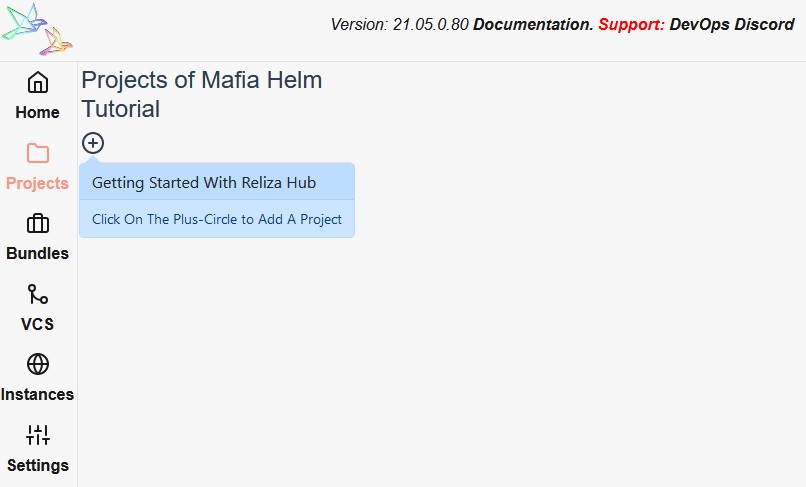
Once a new organization is created, go to Projects menu and click on Plus-Circle icon to create a project.
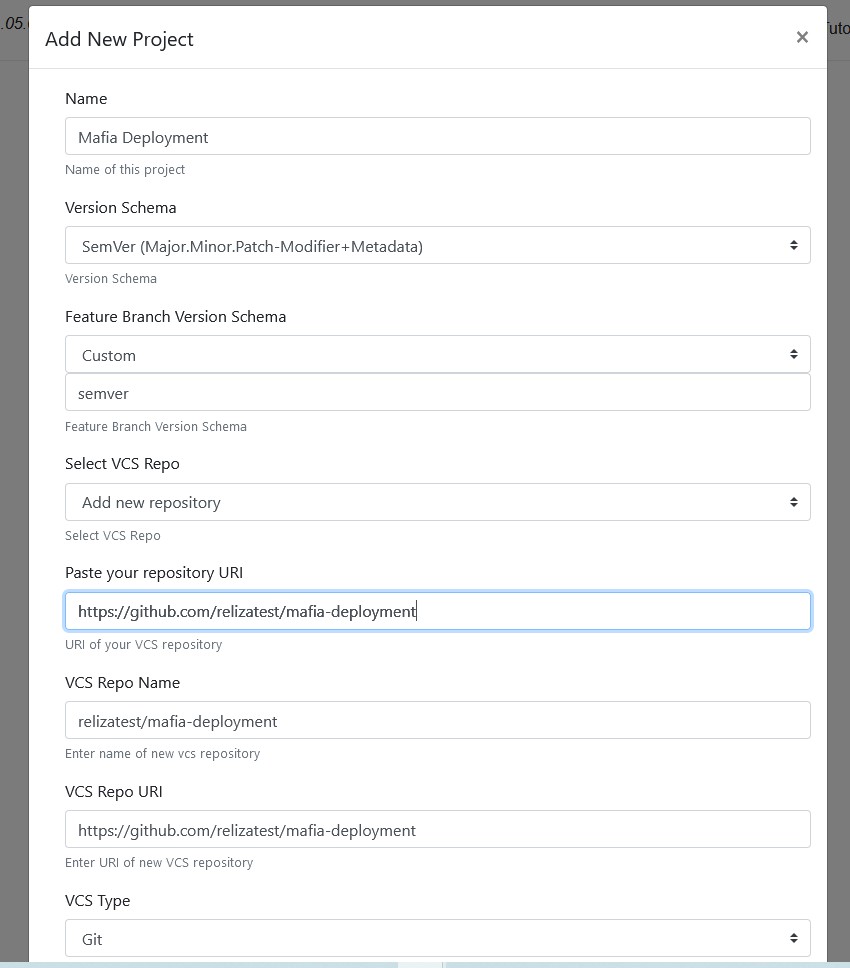
First, add Mafia Deployment project and select “semver” as its schema. Note that Helm requires Chart versions to use Semantic Versioning. Similarly, for the “Feature Branch Version Schema” select “Custom” and type “semver” – for the same reason as above.
For other 2 projects – backend and UI – pick any version schema you prefer. I will use Ubuntu CalVer for those projects in this tutorial, which is a matter of personal preference. As for the feature branch schema, let us use default option which is Branch.Micro.
Also, for each project make sure to opt for “Add new repository” in the “Select VCS Repo” field and paste correct name of your forked repository on GitHub.
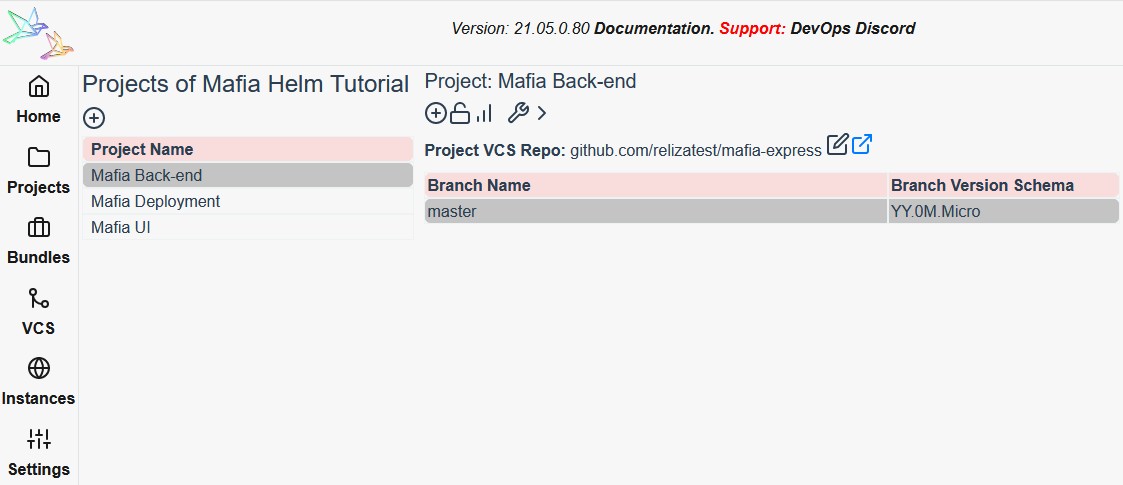
Once all this is done, you will have 3 projects registered on Reliza Hub as following:
Step 3. Activate Docker and Helm Chart Registry on Reliza Hub
Reliza Hub provides OCI-compatible registry which can host Docker images and Helm charts. We will use it in the course of this tutorial for simplicity. Note, that you are free to use any other Registry, but with the one on Reliza Hub you do not need to switch between tools.
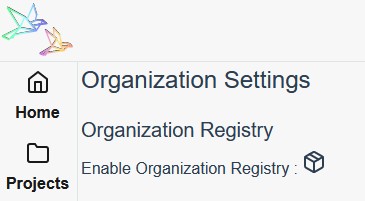
To activate the registry go to the “Settings” page in Reliza Hub and click on the box icon where it says “Enable Organization Registry”.
This will activate registry and display commands to operate it. You can always view the commands again by clicking the same box icon (the message near it will change to “Organization Registry Commands”).
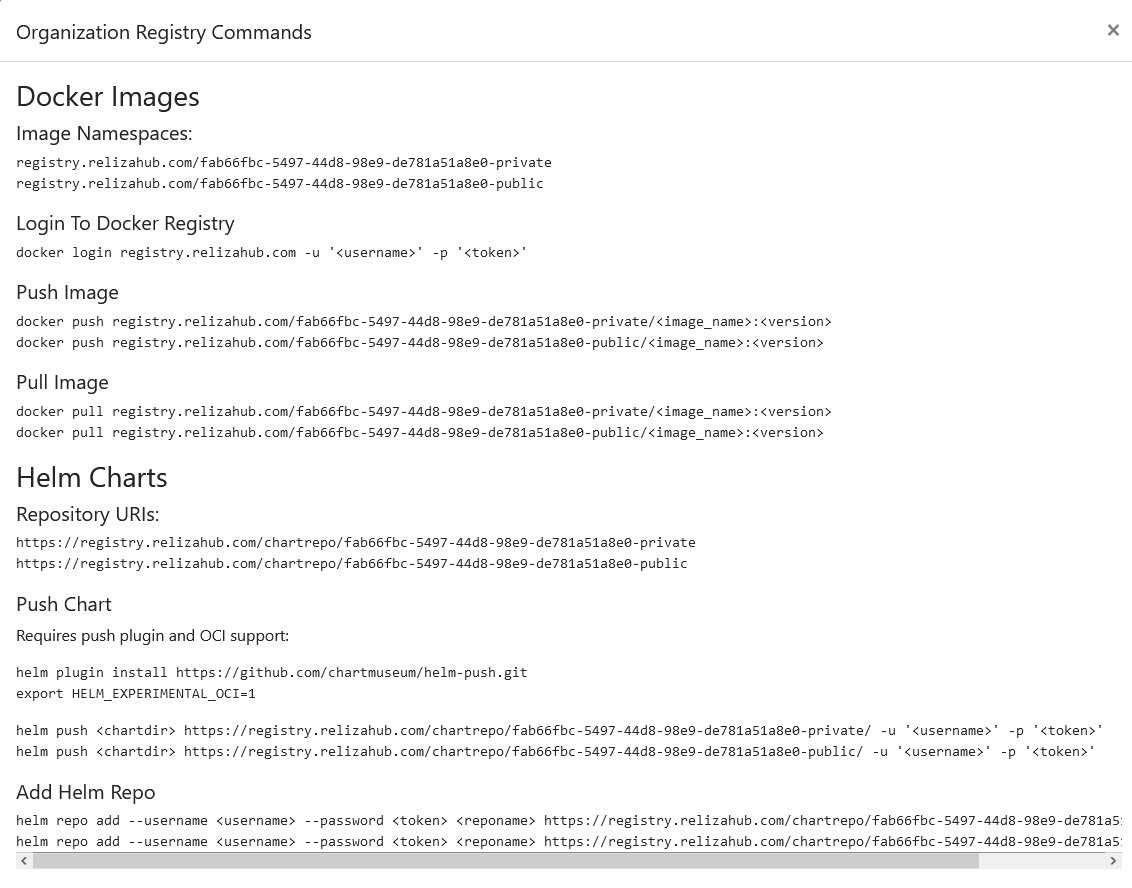
Note URIs of Docker image registries and Helm chart registries.
Next, we need to create a username / token pair to be able to push images and Helm charts to the registry. For this click on the Plus-Circle icon under the Programmatic Access block.
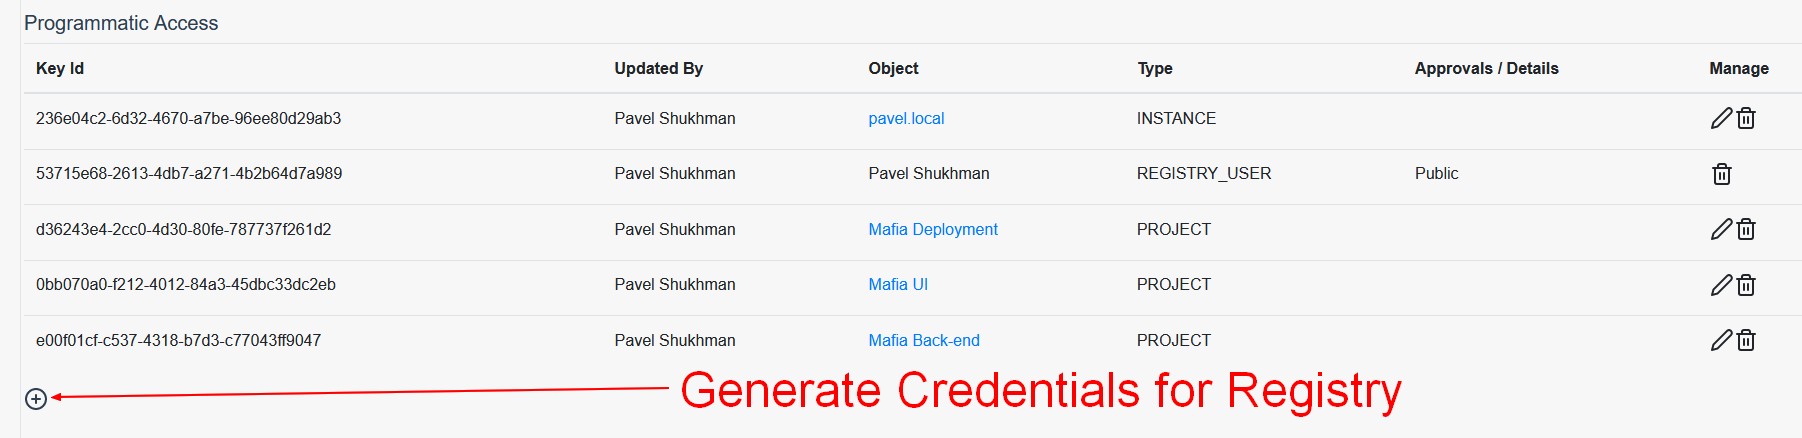
Select either public registry or private registry depending on your project requirements. I will be using public registry for this tutorial. Click “Yes, generate it!” and note displayed username and token.
Step 4. Configure GitHub Actions jobs on forked repositories
Now with our registry set up we can go ahead and configure GitHub Actions jobs on forked repositories.
We’ll start with configuring secrets. Those will be little different based on repository. We would start with mafia-deployment repository.
To configure GitHub Actions secrets, in your repository open “Settings” tab on the top, then open “Secrets” menu on the left.
GitHub Actions job for Mafia Deployment requires 5 following secrets:
HELM_CHART_REPO– set to Helm chart repository noted in Step 3. In my case this will be https://registry.relizahub.com/chartrepo/fab66fbc-5497-44d8-98e9-de781a51a8e0-public/
* NOTE: there must be a slash in the end of the chart repo URI as shown aboveHELM_PUSH_LOGIN– set to Helm registry username noted in Step 3.HELM_PUSH_TOKEN– set to Helm registry token noted in Step 3.
For the next 2 secrets, we first need to obtain API ID and Key from Reliza Hub. Open Mafia Deployment project in Reliza Hub Projects menu and click on the lock icon to obtain API credentials.

After getting credentials set following secrets on GitHub:
RELIZA_API_IDRELIZA_API_KEY
Finally, open “Actions” tab in your GitHub repository. There click on “I understand my workflows, go ahead and enable them”.
Next, trigger a workflow run for your repository. For this we will push a dummy trigger build file. In example, this can be achieved with following shell commands:
echo 1 > helm/trigger_build
git add .
git commit -m "chore: trigger build"
git push
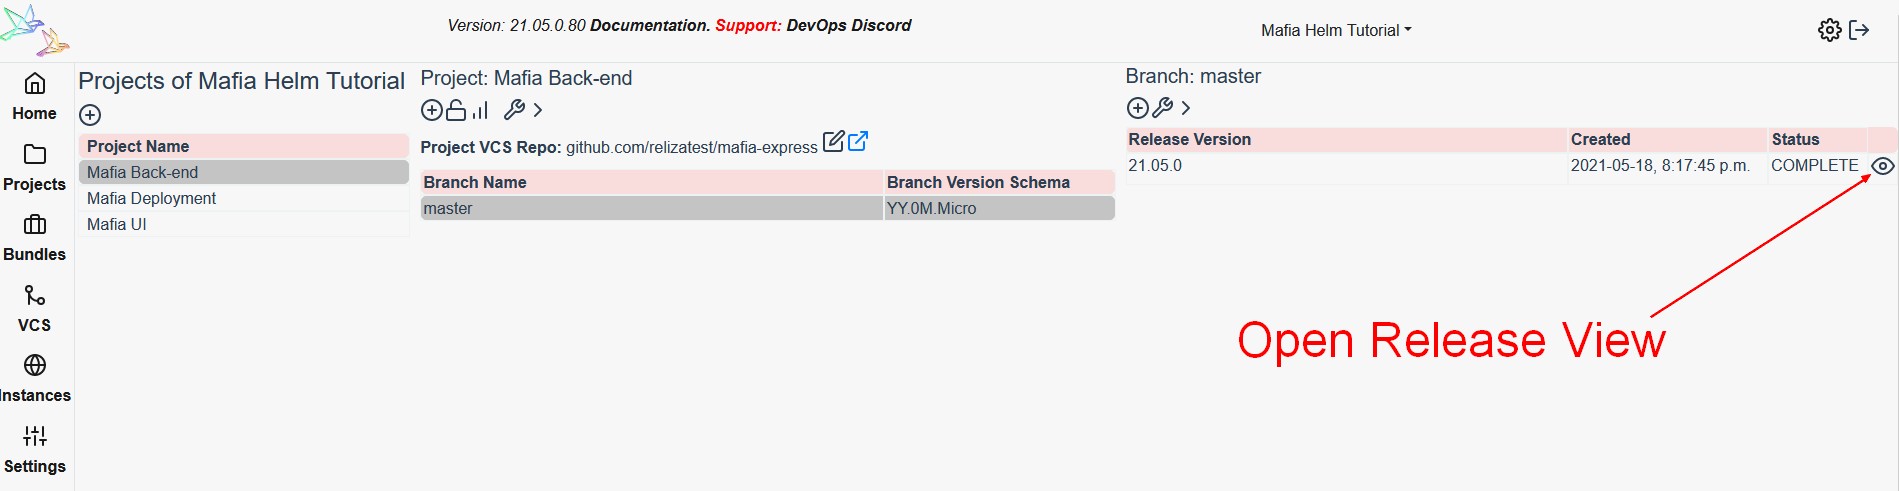
Open your Mafia Deployment project on Reliza Hub and verify that a new release is created and has “COMPLETE” status. This confirms that your Helm chart was built and pushed properly.
Now, in a similar way we would set up secrets for 2 remaining repositories, UI and Back-end. Each of them would have following secrets defined:
DOCKER_LOGIN– same value as Helm chart repository push usernameDOCKER_TOKEN– same value as Helm chart repository push tokenIMAGE_NAMESPACE– as noted in Step 3. In my case this would be registry.relizahub.com/fab66fbc-5497-44d8-98e9-de781a51a8e0-publicIMAGE_NAME– you can pick any name you like, I will use mafia-vue for the UI project and mafia-express for the backend project.RELIZA_API_ID– obtain and configure similarly to Mafia Deployment projectRELIZA_API_KEY– obtain and configure similarly to Mafia Deployment project
After configuring backend and UI repositories, enable GitHub Actions and trigger a build on each of them. Then verify that releases are created on Reliza Hub.
Step 5. Update base values.yaml file in the Helm chart
Now, when we have all our base images published it is time to update our Helm chart values to point to them. Essentially, in the values.yaml file located inside mafia deployment repository in helm/ directory we need to change images to our new base images.
New images can be copied out from the release page on Reliza Hub. For that, in back-end project, open most recent release view.
Then click box icon near the artifact details to copy out image ID. In my case image ID would be: registry.relizahub.com/fab66fbc-5497-44d8-98e9-de781a51a8e0-public/mafia-express@sha256:bb3254832736a06474a833575c01a91d42749c81a0fe1671fb190b03c322a236
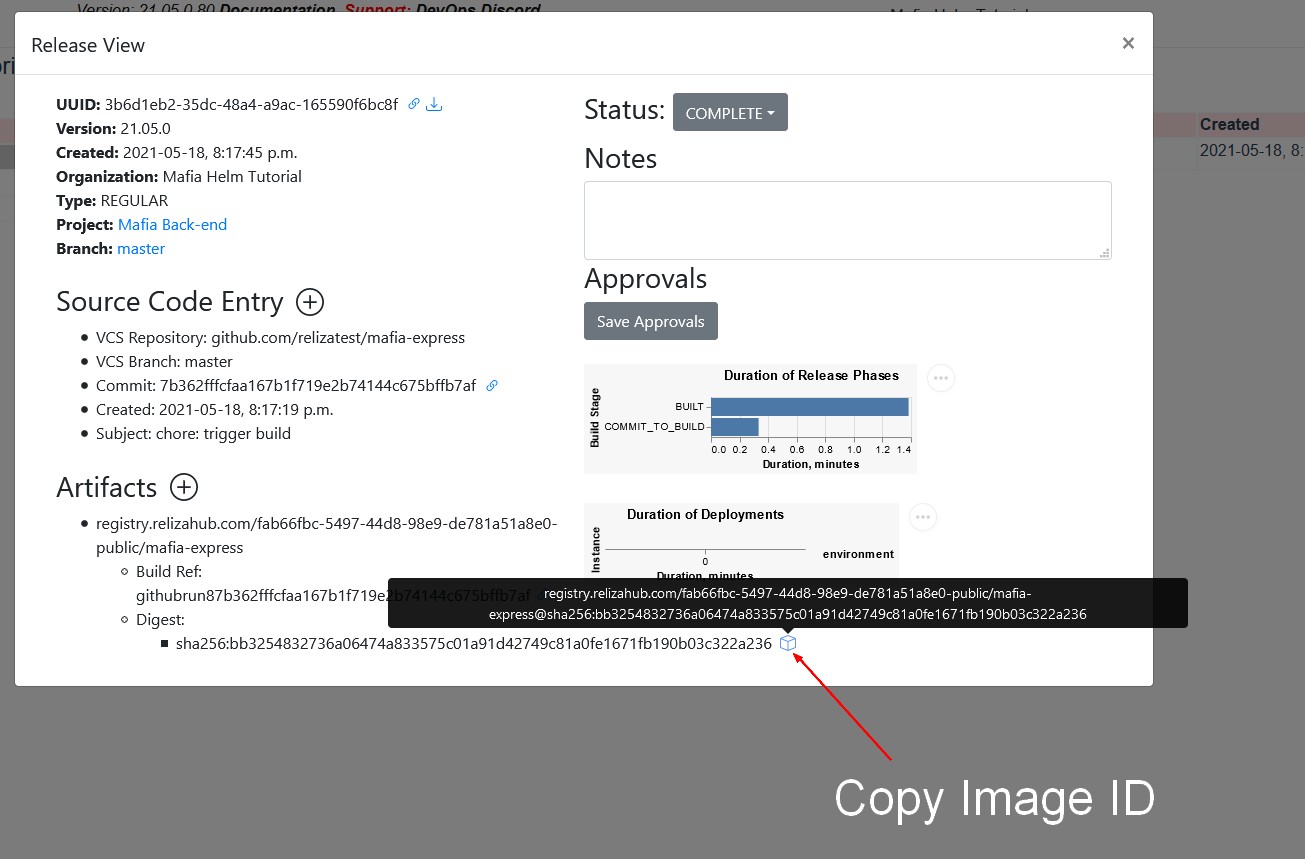
Next, update the back-end image definition in the values.yaml file to the value you just copied.
Similar update should be performed for UI image. You can see the whole change I did in this commit: https://github.com/relizatest/mafia-deployment/commit/360f03dcf88d981572a60ff14b3cdce7cd155474
Step 6. Create your instance on Reliza Hub
In this step we will create and set up instance representation in Reliza Hub. Proceed to the Instance page and click on the Plus-Circle icon to create your instance.
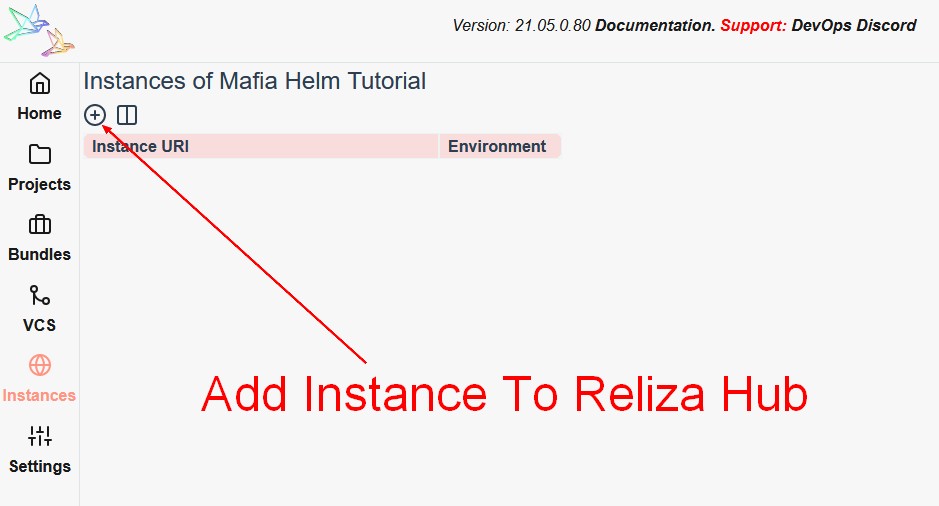
I will do a local deployment so I will use pavel.local as my instance URI and select DEV environment. If you are doing a live deployment, you should enter FQDN URI instead and select appropriate environment.
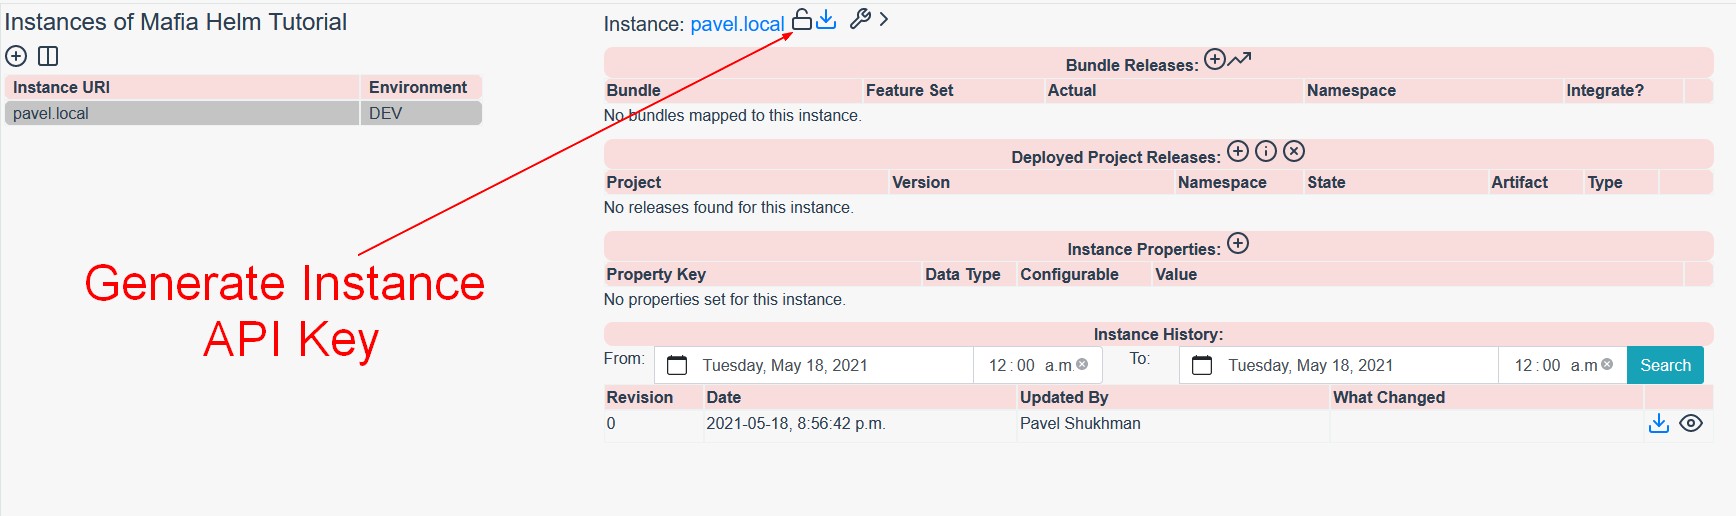
Once the instance is created, click on the Unlock icon near its title to generate Instance API ID and Key. Note those credentials for future steps.
Step 7. Deploy the project on your Kubernetes cluster
This step essentially concludes our deployment. As mentioned in the beginning of this tutorial, you should have a spare k8s cluster prepared as a prerequisite.
Note that by default the project is installed under the root (/) route without any domain prefix. To be exposed it needs some ingress installed on the cluster. Therefore, easiest set up would be k3s cluster with built-in cluster ingress. You may change ingress configurations in the Helm chart to modify this behaviour, but that would be out of scope of this tutorial.
We are going to pick a name for the namespace for Mafia application and then follow steps described in our Helm integration project to do the deployment. We would also need Reliza Instance API Key and ID obtained in Step 5.
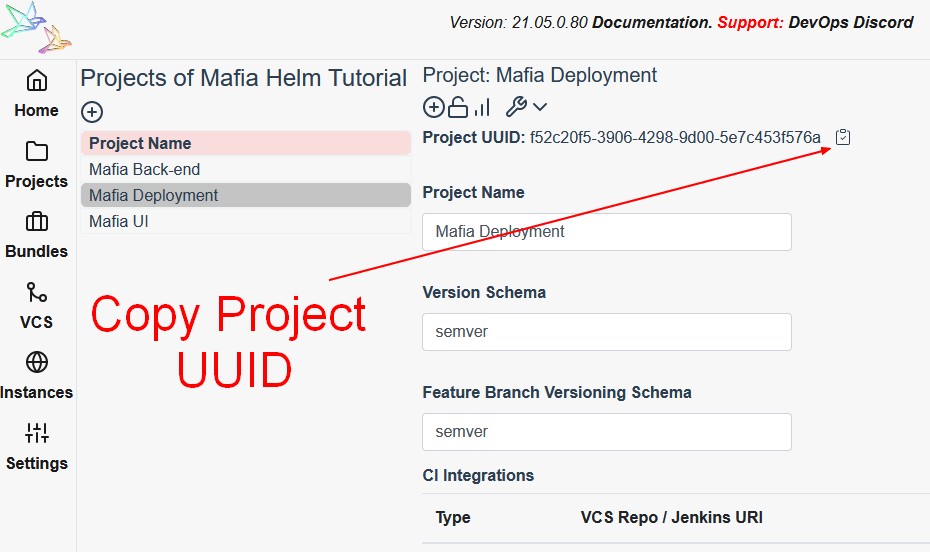
And we would need Reliza Project ID of the Mafia Deployment project. To get the project ID, in the Projects menu of Reliza Hub, open Mafia Deployment project, expand its properties by clicking on the Wrench icon and then click on the Clipboard icon near the project id to copy out the project id.
In my case I will use mafiatutorial namespace and would be issuing following commands to set up the deployment and CD:
kubectl create ns mafiatutorialkubectl create ns helm-reliza-cdkubectl create secret generic helm-reliza-cd-credentials -n helm-reliza-cd --from-literal=reliza-api-id=<RELIZA_INSTANCE_API_ID> --from-literal=reliza-api-key=<RELIZA_INSTANCE_API_KEY> --from-literal=reliza-project-id=<RELIZA_PROJECT_ID>kubectl create configmap helm-reliza-cd-configmap -n helm-reliza-cd --from-literal=namespace=mafiatutorial --from-literal=helm-release-name=mafia --from-literal=base-values-file=values.yamlkubectl apply -f https://raw.githubusercontent.com/relizaio/reliza-hub-integrations/master/Helm-cd-with-Reliza/helm_configmap.yaml -n helm-reliza-cdkubectl apply -f https://raw.githubusercontent.com/relizaio/reliza-hub-integrations/master/Helm-cd-with-Reliza/helmcron.yaml -n helm-reliza-cdkubectl create clusterrolebinding helm-reliza-binding --clusterrole=helm-reliza-cr --serviceaccount=helm-reliza-cd:helm-reliza-sa --dry-run=client -o yaml | kubectl apply -f -
Last step here is to install k8s Reliza Watcher that would monitor deployment status. We will configure Reliza Watcher to monitor only mafiatutorial namespace. Note that Reliza Watcher uses same instance Reliza API ID and Key as above.
I will use following commands to configure Reliza Watcher to monitor mafiatutorial namespace:
kubectl create ns reliza-watcherkubectl create secret generic reliza-watcher-api-key -n reliza-watcher --from-literal=reliza-api-id=<RELIZA_INSTANCE_API_ID> --from-literal=reliza-api-key=<RELIZA_INSTANCE_API_KEY>kubectl create configmap reliza-watcher-configmap -n reliza-watcher --from-literal=namespace=mafiatutorial --from-literal=sender=defaultkubectl apply -f https://raw.githubusercontent.com/relizaio/reliza-hub-integrations/master/kubernetes/reliza-watcher.yaml -n reliza-watcher
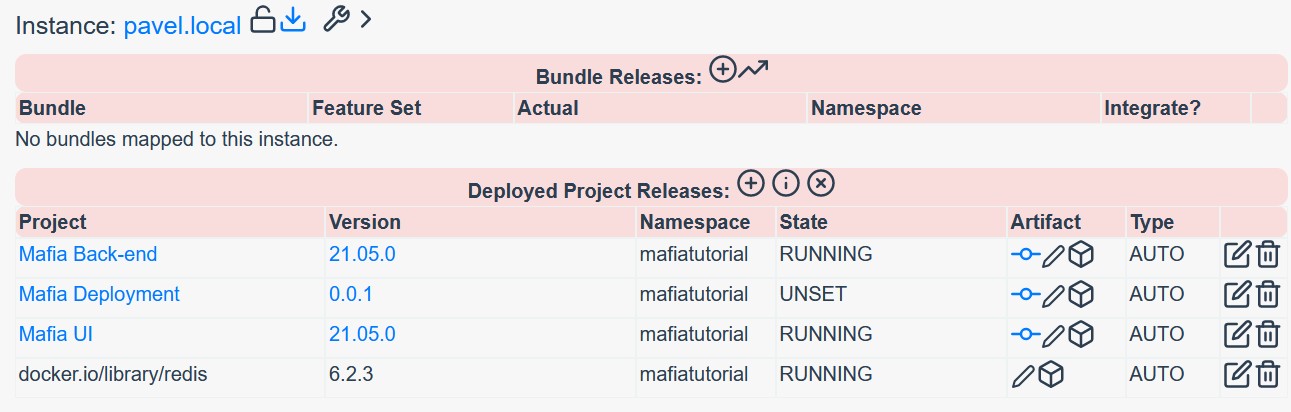
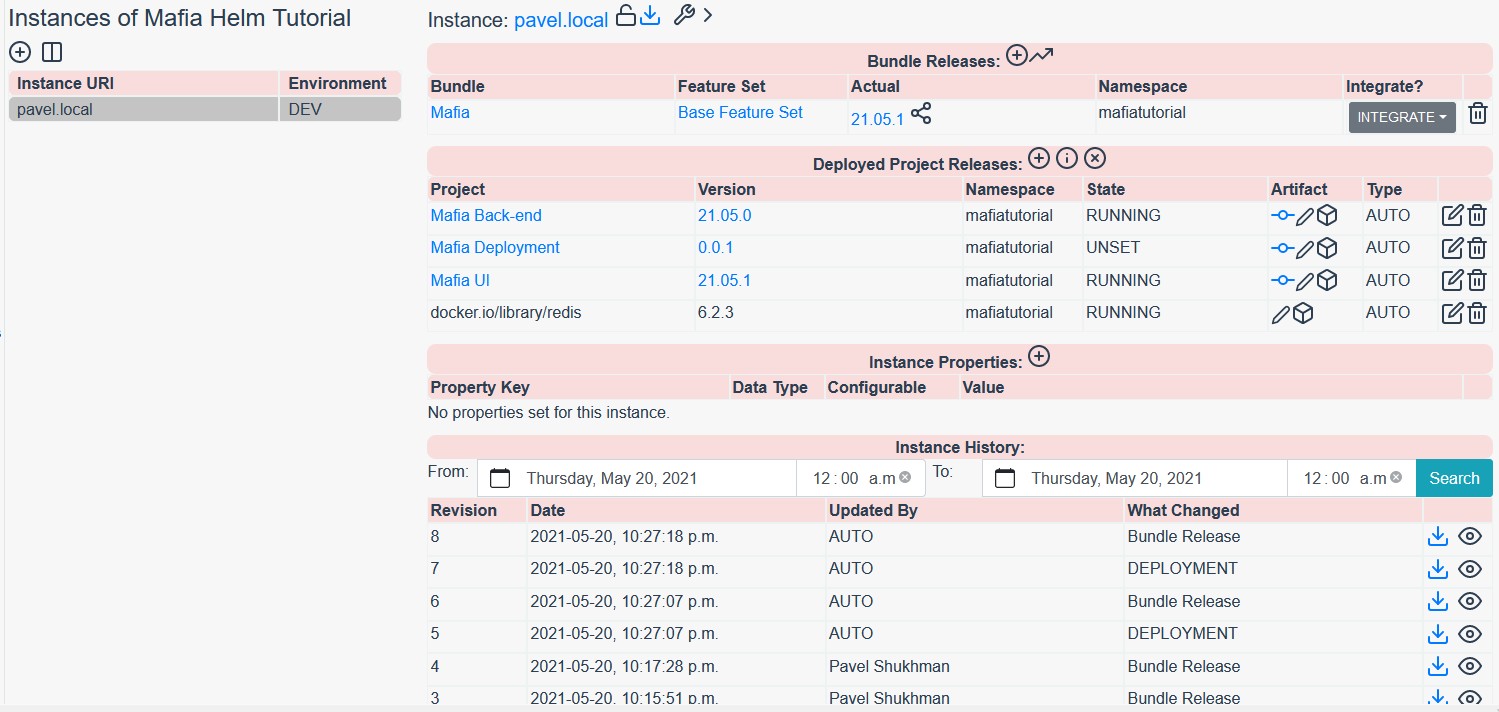
Observe Instance page in Reliza Hub – you will notice the state of the mafiatutorial namespace showing all deployed images.
Step 8. Bundle up releases (optional)
While this step is optional, it helps a lot to bundle state of the various microservices in the application. Later, it is also possible to specify in Reliza Hub either bundle or individual microservice deployment strategy.
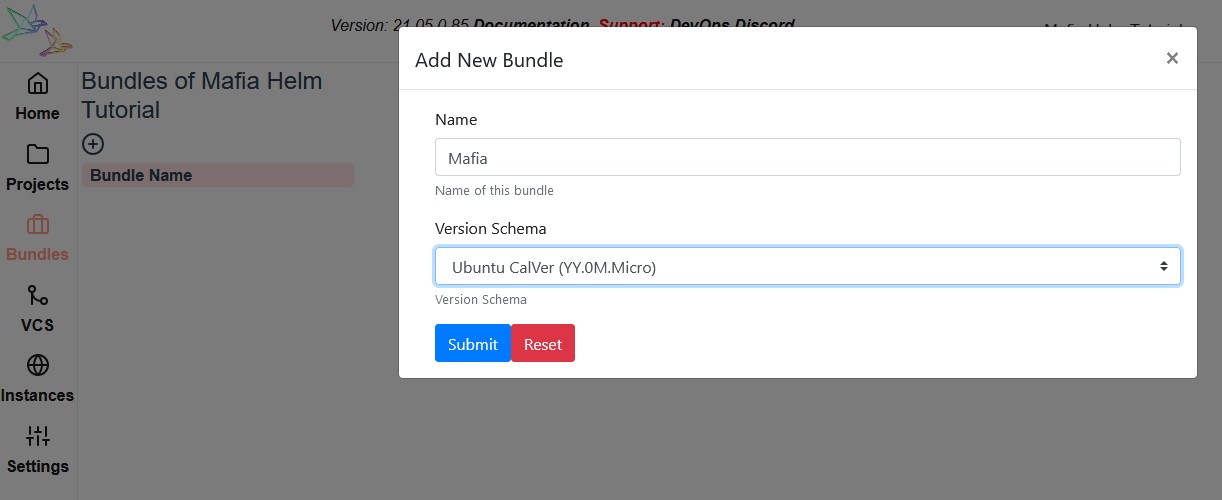
To bundle releases, open the Bundles menu in Reliza Hub and click Plus-Circle icon to create a new Bundle. I will call it Mafia and use Ubuntu CalVer versioning.
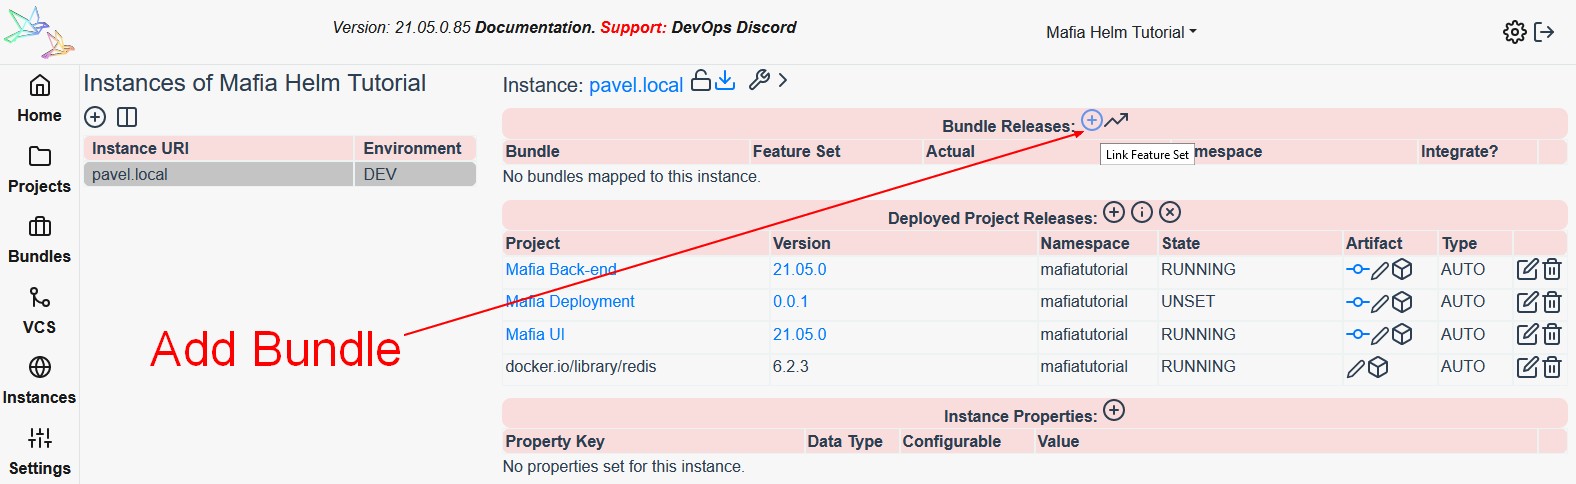
Next go back to the instance and click on the Plus-Circle icon where it says Bundle Releases.
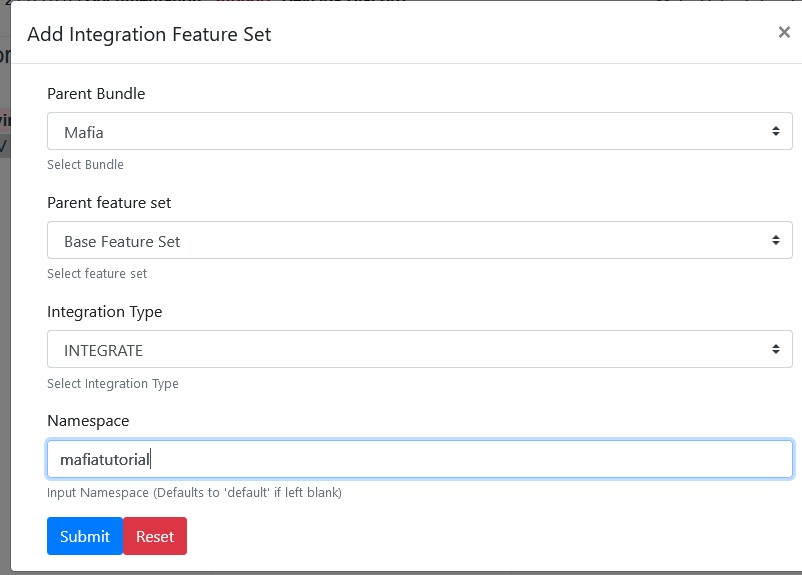
Pick Mafia bundle, choose Base Feature Set, set integration type to Integrate and namespace to mafiatutorial (or whichever namespace you were using).
Finally click on the trending-up icon to generate first bundle release. Notice that a new bundle version is now created.
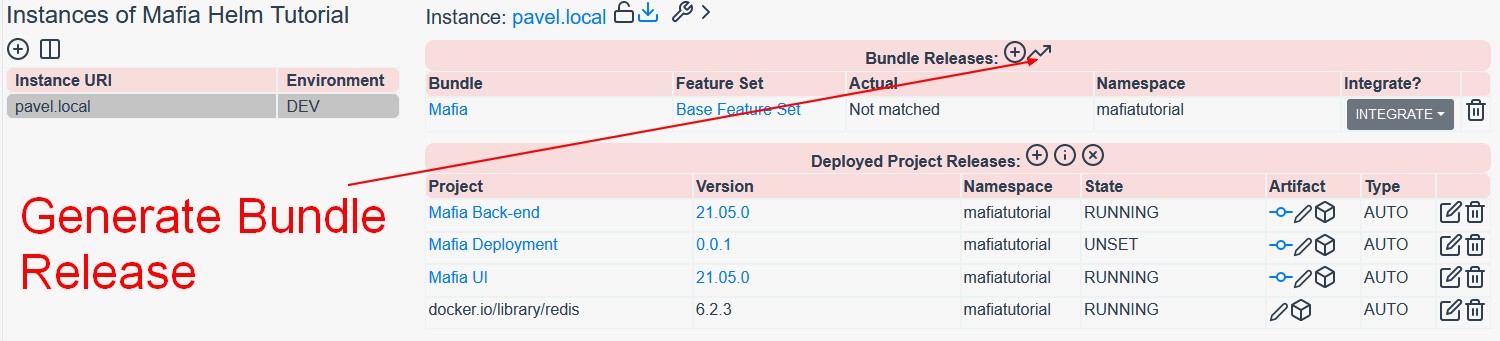
Note, that you would need to manually trigger bundle release only once. On subsequent deployments, bundle versions would be created and recorded automatically.
Step 9. Perform code update and observe CD picking up
I will now update my UI code to trigger CD pipeline and verify that the update works as expected. I am going to capitalize welcome to the room message in the CardShuffle.vue file in my UI project. Here is the commit I did.
If everything was configured correctly, you can open instance on Reliza Hub and notice that the UI image was updated and also new bundle release version was generated.
Handling Private Helm Charts
This is beyond the scope of the tutorial above, but it shows how to deal with a frequent use-case of using private helm charts.
If we are dealing with a private helm chart, few customizations to the above approach are needed.
First, when creating a secret, it should be extended with helm-login and helm-pass fields, as following:
kubectl create secret generic helm-reliza-cd-credentials -n helm-reliza-cd --from-literal=reliza-api-id=<RELIZA_INSTANCE_API_ID> --from-literal=reliza-api-key=<RELIZA_INSTANCE_API_KEY> --from-literal=reliza-project-id=<RELIZA_PROJECT_ID> --from-literal=helm-login=<HELM_LOGIN> --from-literal=helm-pass=<HELM_PASS>Note here that in the case of AWS ECR, helm-login should be set to AWS API ID, while helm-pass should be set to AWS API Key.
Next, a special configmap which handles credentials should be used, as following:
kubectl apply -f https://raw.githubusercontent.com/relizaio/reliza-hub-integrations/master/Helm-cd-with-Reliza/helm_configmap_creds.yaml -n helm-reliza-cdNext, a special cron job should be applied as well. Note, it comes in two flavors – for a standard helm repository and for AWS ECR.
Standard one would look as following:
kubectl apply -f https://raw.githubusercontent.com/relizaio/reliza-hub-integrations/master/Helm-cd-with-Reliza/helmcron_creds.yaml -n helm-reliza-cdWhile ECR one would use a different file:
kubectl apply -f https://raw.githubusercontent.com/relizaio/reliza-hub-integrations/master/Helm-cd-with-Reliza/helmcron_creds_ecr.yaml -n helm-reliza-cdThis is all that is needed to support private helm repositories.
Deployments Over Multiple Namespaces
One more issue that we discovered over time with testing is the case where we deploy several Reliza CD pipelines over different namespaces. The only issue here is that per each namespace we need to create a separate cluster role binding.
I.e., if our initial cluster role binding is defined as per tutorial above:
kubectl create clusterrolebinding helm-reliza-binding --clusterrole=helm-reliza-cr --serviceaccount=helm-reliza-cd:helm-reliza-sa --dry-run=client -o yaml | kubectl apply -fThen for a next namespace we would need to use a different name for cluster role binding, for example – as following, assuming our other namespace is called “helm-reliza-cd-2“:
kubectl create clusterrolebinding helm-reliza-binding-2 --clusterrole=helm-reliza-cr --serviceaccount=helm-reliza-cd-2:helm-reliza-sa --dry-run=client -o yaml | kubectl apply -f -Next Steps
This concludes this tutorial as we achieved desired CD functionality, albeit with only one instance.
Following steps include:
- Setting slack notifications as described here.
- Advanced approval capabilities which can be either manual or automated and approval matrix based on which releases can be seamlessly promoted to the higher level environments (i.e. Test – Staging – Production). See my demo here.
- Exploring further automated approval capabilities with automated QA testing.
- More tutorials and use cases coming soon!
2 comments